Welcome fnirs arduino to the fascinating world of fNIRS Arduino! If you’re curious about how this cutting-edge technology is revolutionizing brain research, you’ve come to the right place. In this blog post, we’ll dive into what exactly fNIRS Arduino is, explore its various types, discuss its advantages and disadvantages, learn how to use it effectively, and wrap up with some concluding thoughts. So grab a cup of coffee and get ready for an enlightening journey into the realm of fNIRS Arduino!
What is fnirs arduino?
fNIRS Arduino is a powerful and versatile technology that combines functional near-infrared spectroscopy (fNIRS) with the flexible capabilities of an Arduino microcontroller. But what does all of this mean? Let’s break it down.
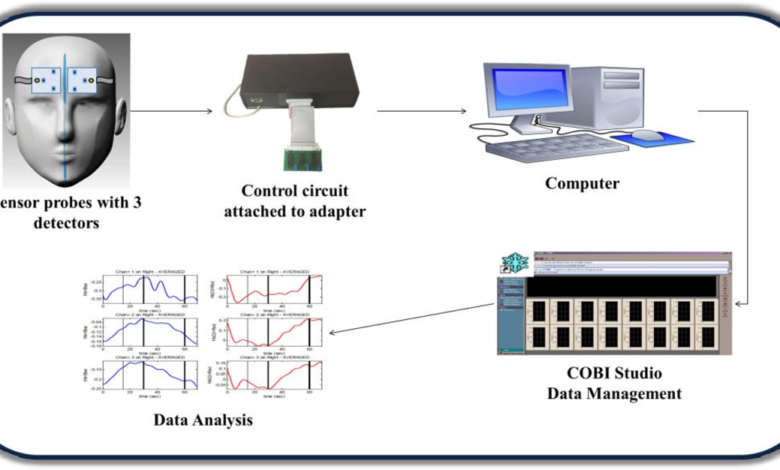
Functional near-infrared spectroscopy, or fNIRS for short, is a non-invasive imaging technique used to measure changes in oxygen levels in the brain. By shining near-infrared light onto the scalp and measuring how much light is absorbed and scattered, researchers can gain insights into brain activity.
Now, enter the Arduino microcontroller – a small but mighty device that has revolutionized the world of DIY electronics. With its programmable nature and extensive range of sensors and inputs, an Arduino opens up endless possibilities for customization and integration.
When these two technologies are combined, we get fNIRS Arduino – a dynamic tool that allows researchers to gather real-time data on brain function while also having full control over experimental design. Whether you’re studying cognitive processes, investigating neurological disorders, or exploring human-computer interaction, fNIRS Arduino offers incredible flexibility and precision.
The beauty of fNIRS Arduino lies not only in its functionality but also in its accessibility. Thanks to open-source software libraries and abundant online resources, even those without extensive coding experience can dive into this exciting field with relative ease.
So whether you’re an aspiring neuroscientist looking to explore new frontiers or simply curious about how our brains work behind the scenes, fNIRS Arduino provides an innovative platform for unlocking the mysteries of human cognition. Get ready to delve into uncharted territories as we discover more about this fascinating technology!
Different types of fnirs arduino
Different Types of fnirs arduino:
1. Arduino Uno:
The Arduino Uno is the most common and widely used board in the Arduino family. It is a great choice for beginners due to its simplicity and ease of use. The Uno has a microcontroller, digital input/output pins, analog inputs, and can be easily programmed using the Arduino IDE.
2. Arduino Mega:
The Arduino Mega offers more memory and additional hardware features compared to the Uno. It has more digital input/output pins, more analog inputs, and multiple serial communication ports. This makes it suitable for projects that require a larger number of sensors or devices to be connected.
3. ESP32:
The ESP32 is not strictly an Arduino board but can be programmed using the Arduino IDE. It combines Wi-Fi and Bluetooth capabilities with powerful processing power, making it ideal for projects that require wireless connectivity.
4. Teensy 4.x:
Teensy boards are smaller than traditional Arduinos but pack a punch in terms of performance. The Teensy 4.x series boasts impressive processing power while still being compatible with the vast library of Arduino code.
5. LilyPad Arduino:
LilyPad boards are designed specifically for wearable electronics projects as they are small, flexible, and sewable onto fabric or textiles.
Each type of fnirs arduino has its own unique features and advantages depending on your project requirements.
Pros and cons of fnirs arduino
Pros and cons of fnirs arduino
When it comes to the world of neuroimaging, functional near-infrared spectroscopy (fNIRS) has gained popularity due to its non-invasive nature and portability. And when combined with the power of Arduino, a microcontroller platform, researchers have found an innovative way to enhance their experiments. But like any technology, there are pros and cons to using fNIRS Arduino.
One significant advantage is the flexibility it offers in terms of experiment design. With fNIRS Arduino, researchers can easily customize their setups according to their specific needs. The open-source nature of both fNIRS and Arduino allows for endless possibilities in terms of hardware configurations and data analysis techniques.
Another benefit is cost-effectiveness. Compared to other neuroimaging techniques such as functional magnetic resonance imaging (fMRI), fNIRS Arduino provides a more affordable option without compromising on quality. This makes it accessible to researchers working on tight budgets or those conducting studies in resource-limited settings.
Additionally, fNIRS Arduino enables real-time monitoring capabilities. Researchers can obtain immediate feedback during experiments, allowing them to make adjustments on-the-go if necessary. This real-time feedback can be valuable in various fields such as cognitive neuroscience or rehabilitation therapies where precise timing is crucial.
However, there are also some limitations associated with using fNIRS Arduino. One challenge is its relatively lower spatial resolution compared to other neuroimaging methods like fMRI or electroencephalography (EEG). While fNIRS captures hemodynamic changes occurring within the brain’s cortex region accurately, it may not provide detailed information about deep brain structures.
Another limitation relates to signal contamination from external sources such as ambient light or motion artifacts caused by participant movement during experiments. Researchers need advanced signal processing algorithms or additional measures like optode fixation devices to mitigate these issues effectively.
Moreover, despite being portable and flexible compared to traditional neuroimaging tools, fNIRS Arduino still requires some level of technical expertise to set up and
How to use fnirs arduino
How to use fnirs arduino:
1. Familiarize Yourself with the Hardware: Before diving into the world of fNIRS Arduino, it’s essential to understand the hardware components involved. Take some time to get acquainted with the Arduino board and its various pins, as well as any additional sensors or modules you may be using.
2. Install the Necessary Software: Next, ensure that you have all the required software installed on your computer. This typically includes an Integrated Development Environment (IDE) for programming your Arduino, such as Arduino IDE or PlatformIO.
3. Connect Your Hardware: Once you have everything set up, it’s time to connect your fNIRS sensors and other peripherals to your Arduino board. Carefully follow the wiring diagrams provided by the manufacturer and double-check all connections before proceeding.
4. Upload a Sample Sketch: To test if everything is working correctly, upload a sample sketch provided with your fNIRS Arduino kit. This will help verify that data is being collected from the sensors and transmitted successfully.
5. Customize Your Code: After confirming that the basic functionality is working fine, you can start customizing your code according to specific research requirements or application needs. This may involve modifying sensor settings, implementing algorithms for real-time processing, or integrating communication protocols for data transmission.
6. Validate and Iterate: It’s crucial to validate your results against established benchmarks or ground truth measurements in order to assess accuracy and reliability consistently over time. If necessary, make iterative changes to improve performance until desired outcomes are achieved.
Remember that this guide offers only a brief overview of how to use fNIRS Arduino effectively; each project will have its unique challenges and considerations based on individual research goals or application scenarios.
Conclusion
Conclusion
Fnirs Arduino is a powerful tool that combines the capabilities of functional near-infrared spectroscopy (fNIRS) and Arduino microcontrollers. It offers researchers, developers, and enthusiasts an affordable and accessible way to explore brain activity and create innovative applications.
Throughout this article, we have discussed what fnirs Arduino is, the different types available in the market, as well as its pros and cons. We have also explored how to use fnirs Arduino effectively for various purposes.
One of the key advantages of fnirs Arduino is its versatility. With a wide range of sensors and modules available, users can customize their setups according to their specific needs. This flexibility opens up numerous possibilities for research in fields such as neuroimaging, cognitive science, human-computer interaction, and more.
Additionally, fnirs Arduino offers real-time data acquisition and analysis capabilities. This allows researchers to gather immediate insights into brain activity without relying on expensive or complex equipment. The user-friendly nature of both fNIRS technology and the Arduino platform makes it accessible even to those with limited technical expertise.
However, like any technology, there are some limitations associated with fnirs Arduino. These include potential signal contamination from external sources such as ambient light or motion artifacts. Careful experimental design and data preprocessing techniques are necessary to mitigate these challenges effectively.
In conclusion (without explicitly stating “in conclusion”), fnirs Arduino presents an exciting opportunity for individuals interested in exploring brain activity using cost-effective tools. Whether you are a researcher looking for a portable solution or an enthusiast interested in developing novel applications related to neuroscience or biometrics – fnirs arduino has something to offer you! Embrace this innovative technology and unlock new frontiers in understanding the complexities of our brains!

![[silent war] taming a tsundere](https://newsipedia.com/wp-content/uploads/2024/04/download-20-1.jpeg)